Getting started with Unit Testing for AngularJS
A quick-start guide to writing unit tests using Jasmine for AngularJS.
on
This is the first of many posts on the topic of writing tests with AngularJS. In order to get started unit testing with AngularJS, we first need to gain a grounding in some of the underlying testing tools, and some of the principles of writing unit tests.
We start by reviewing Jasmine, which is a behaviour driven development framework for JavaScript. This sometimes causes confusion as it describes itself as a behaviour driven development framework (BDD) but it can also be used to write unit tests with a test driven development (TDD) approach. Aren’t TDD and BDD supposed to be different? Shouldn’t we use a test driven development framework?
Yes the styles are different, but as we will see you can use Jasmine with a TDD approach also. The framework offers structure for organising the tests and functions for asserting the output of our code. Whether a group of tests are considered to be TDD or BDD depends on how the tests are constructed by the developer (much more to come on that in future posts). To get started we consider TDD / Unit Tests only.
Writing your first unit test
Copy-paste the following HTML into a new file and open with a browser:
<html>
	<head>
		<link rel="stylesheet" type="text/css" href="https://cdnjs.cloudflare.com/ajax/libs/jasmine/2.3.3/jasmine.min.css">
		<script src="https://cdnjs.cloudflare.com/ajax/libs/jasmine/2.3.3/jasmine.min.js"></script>
		<script type="text/javascript" src="https://cdnjs.cloudflare.com/ajax/libs/jasmine/2.3.3/jasmine-html.min.js"></script>
		<script type="text/javascript" src="https://cdnjs.cloudflare.com/ajax/libs/jasmine/2.3.3/boot.min.js"></script>
	</head>
	<body>
	</body>
	<script type="text/javascript">

		// Paste in the test code here.

	</script>
</html>
The browser should display the following:

Note the terminology specs in the output. This is short for specifications and is part of the terminology of BDD. For now, simply consider it to be a logical grouping of tests.
Add the following code in the script tag of the HTML file:
describe('calculator', function () {
	it('1 + 1 should equal 2');
});
The describe function represents a spec (logical grouping of tests). The it function indicates a test within the logical grouping. Refreshing the browser will show the pending test:

The test is in a pending state since we have yet to add the body of the test. Let’s do that next. Replace the previous it function with the following:
it('1 + 1 should equal 2', function() {
	expect(1 + 1).toBe(1);
});
After a browser refresh, we should see a failing test, since 1 + 1 does not equal 1!
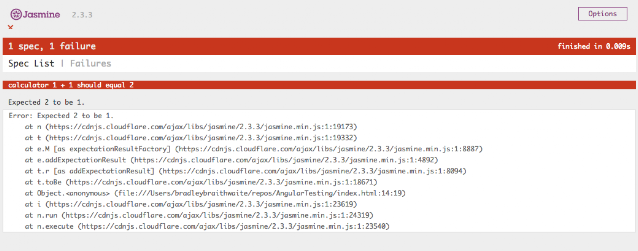
Here we introduced expect and toBe functions from the Jasmine framework. Expect (called an Expectation) takes the expression we wish to test and wraps it so that we can call functions to assert the result of the expression evaluation. The functions we can call, are called Matchers (the function toBe). Other matchers provided by the framework that we will commonly use are:
expect(true).toBe(true);
expect(false).not.toBe(true);
expect(1).toEqual(1);
expect('foo').toEqual('foo');
expect('foo').not.toEqual('bar');
Finally, let’s make the test pass:
it('1 + 1 should equal 2', function() {
	expect(1 + 1).toBe(2);
});
We will now see that the test is passing after refreshing the browser:

Getting into the unit testing flow
Now that we have the basics of Jasmine, let’s look at developing the TDD flow. To recap, TDD or Test Driven Development is the principle of tighly integrating the writing of tests at the same time of writing of the feature. Taking the time to cultivate this skill is great for productivity when writing code.
The flow is commonly described as Red, Green, Refactor. For each test we write, we should follow this sequence:

The breakdown of each step is as follows:
- Red - Write a failing test. Why? To eliminate bugs in our test code.
- Green - Write enough code to make the test pass. This ties in with the previous step to catch any bugs in our test logic.
- Refactor - Refactor the implementation. We can make improvements to the code and have to safety net of the tests to be sure we didn’t break something.
Cultivating this flow gives us a tight feedback loop where we iterate though a feature quickly and accurately, ending up with a safety net of tests giving us the confidence to refactor the code at each step.
A Step-by-Step Example
Let’s write some code following this process.
1. Write a failing test
This test will fail, because we don’t have any implementation detail for the calculator:
describe('calculator', function () {

	it('1 + 1 should equal 2', function () {
		expect(calculator.sum(1, 1)).toBe(2);
	});

});
2. Make the test pass
If we write just enough code to make the test pass, we should have something that resembles this:
var calculator = {
	sum: function(x, y) {
		return 2; // <-- note this is hardcoded
	}
}

describe('calculator', function () {

	it('1 + 1 should equal 2', function () {
		expect(calculator.sum(1, 1)).toBe(2);
	});

});
Doing this helps to rule out any mistakes with the the code for the test itself.
3. Refactor
Now that we’ve established that our test logic is ok, we can go ahead and add more of the logic. As long as we still see passing tests, we can have confidence in our code:
var calculator = {
	sum: function(x, y) {
		return x + y;
	}
}

describe('calculator', function () {

	it('1 + 1 should equal 2', function () {
		expect(calculator.sum(1, 1)).toBe(2);
	});

});
Now you try:
As an exercise, add a feature to the calculator for subtracting and dividing numbers. For the divide feature we will add the following twist: if the divisor is zero e.g. 10 / 0, the function should return 0 to prevent the divisible by zero problem.
My solution:
Here’s a gist of the code I wrote, or you can watch this short video that demonstrates the TDD flow when coding this.
Summary
We’ve only scratched the surface of TDD, but this will give us a foundation to build upon. In the next set of posts we will look at the Karma testing tool and how that integrates with Jasmine, and we will then start to consider applying these concepts to AngularJS code. The next post is now available and discusses how to Unit Test an AngularJS Controller.
For TDD practice you may want to check out some of the TDD Katas below: